
This is part two in a series of posts describing the value and implementation of Docs as Tests.
Contents
EDIT 6/30/25: I have created a companion video that illustrates the points of this post (and more). Just want to see how to set up and run Docs as Tests? Use this link to jump straight there.
Previously On Docs as Tests
- I described the promise of the Docs As Tests discipline coined by Manny Silva and borrowed liberally from Manny’s fantastic book of the same name.
- I then went on to categorize some of the tools mentioned in the book before encouraging documentarians to start thinking about what part(s) of their environment might benefit the most from a Docs as Tests implementation.
- Finally, I presented a very simple demo showing how Docs as Tests (and Manny’s Doc Detective tool, in this case) can catch a divergence between a product (a web application in this scenario) and the documentation intended to describe it.
Intended Audience
My last post was very much focused on the business value of Docs as Tests and [hopefully] building some excitement in the minds of technical writers. But in this one my goal is to provide enough technical detail to whet the appetite of more technical folks (think developers, DocOps, etc.) while still bringing along those of you tech writers (or documentarians, if you prefer) that dared to dream after seeing the demo from last time.
By the way, it’s important I acknowledge that some documentarians write code and some software engineers write docs—I will do my best to meet you where you are!
Technical Approach
I fully admit that trying to create an instructional technical post for such a diverse set of readers is a bit like threading a needle, but I am going to try anyway 😊 So I’ll start with some suggestions as you read this post:
- For folks with less technical experience: this might feel a bit like onboarding at your last job (but hopefully more fun!), as I am going to introduce you to the tools, commands, etc. that you’ll need to run the demo from the last post (and more) yourself. If at any point you feel overwhelmed, that’s fine—you are welcome to email me or take a break and come back in an hour, a day, or a week.
- For folks with more technical experience: I’ll try to structure things so you can easily skip over sections you might know (e.g. – installing VS Code).
- For everyone: if you need help or have questions/feedback regarding this post; go ahead and email me or leave a comment below. On the other hand, if your questions/feedback relate to Doc Detective, visit the Doc Detective Discord or LinkedIn page.
Goals for this post
- Discuss where the testing we’re doing fits with automated software tests
- Install prerequisites
- Run tests
Where Are We?
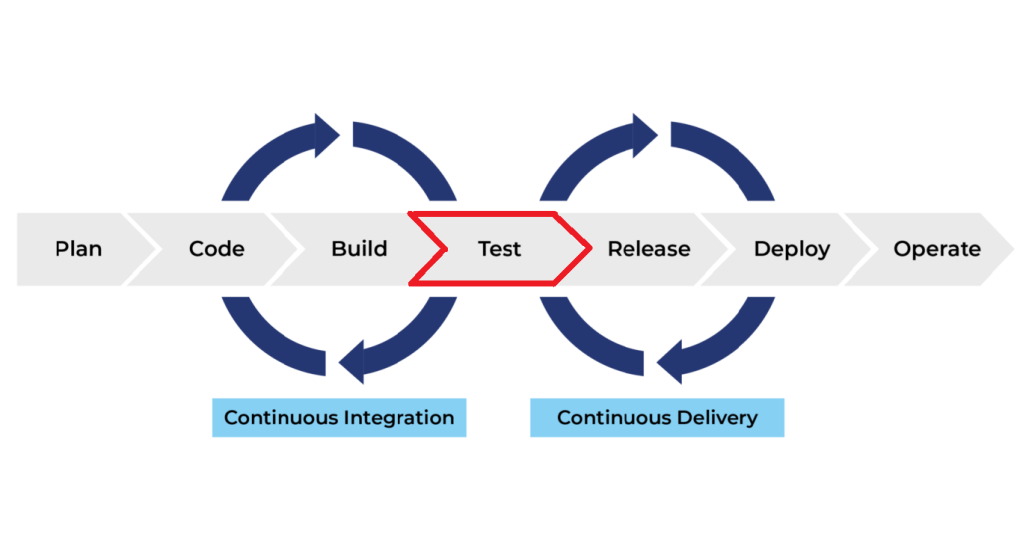
Before getting into the technical stuff I want to paint a picture of where Docs as Tests lives in the software development and documentation space. If you have any familiarity with Continuous Integration / Continuous Delivery (or CI/CD), you’ve probably seen a diagram like the one below.
CI/CD Diagram (click to collapse/expand)

Image source: https://www.primotech.com/ci-cd-pipeline-everything-you-need-to-know/
Basically, the software (and docs) development process goes from left to right . Now for our purposes, we want to focus on the test step.
CI/CD Diagram (test step)
But let’s zoom in a bit.
Types of Tests
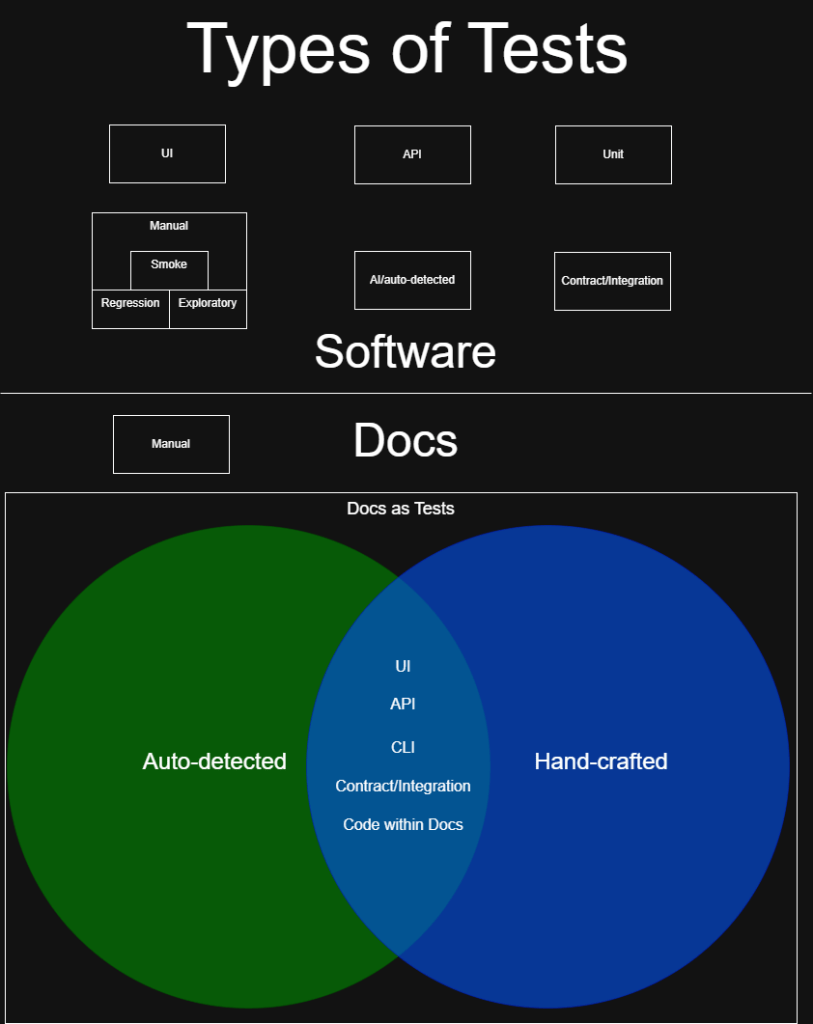
A word of caution: this diagram is by no means a complete picture of all types of testing (especially on the software development side). Also, if you think about it too much you’ll see there’s a bit of an apples to oranges comparison going on😅
It seems fair to say that software testing is more mature as a discipline than Docs as Tests—after all, it has been around for much longer. This is reflected in the diagram above where I show the various flavors of software testing.
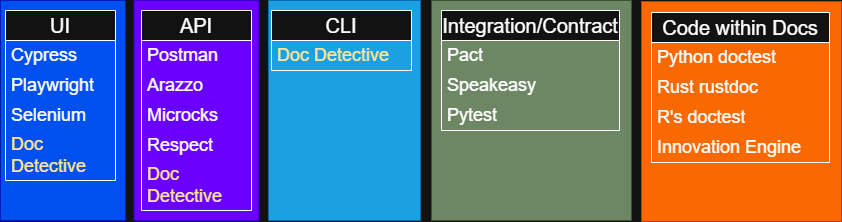
But Docs as Tests is catching up fast! When you look at the Venn diagram in the Docs section of the diagram, do you see anything familiar? You might recall (or not, which is fine!) how in the last post I shared an image listing some of the tools we have available for testing various parts of our docs.
Below is that image [slightly altered for correctness/emphasis] again. The takeaway here is that despite Docs As Tests being the new kid (compared to software testing), we already have lots of tools we can use for our tests!
All right, that’s enough mental positioning—let’s get your environment ready to do some testing!
Prerequisites
You can’t save the world without the right tools, especially a crowbar.
Gordon Freeman (probably)
I am going to list the tools that you’ll need and where to get them. I believe they are all available in Windows, Mac, and Linux environments, but let me know if you run into issues and we’ll figure something out.
Also, I know that people might prefer different tools. For example, the newer Cursor IDE has gained some popularity. Of course, if you are using a different IDE than VS Code, I suspect you already have the tools listed below (or equivalent) installed and can skip down to cloning my repo 😊
OK, let’s get started.
Tools
- Download and install Git.
Don’t be intimidated by the Git installer: it has many screens with different options (or at least the Windows one does), but the defaults ought to be fine in most cases. Like good defaults should be!
- Download and install Visual Studio Code (VS Code) (or your preferred IDE)
- Download and install Node.js
I can vouch for Node.js major version 22 working fine with the tools we will use in these tests, but thankfully you can install multiple versions of Node if you need to use an older version for some reason.
Code
- Clone my docsastests-demo repository
This process will put a copy of my docsastests-demo repo on your machine. I’ll provide steps that should work in any environment.
- Open a command prompt or terminal of some kind
- Navigate to the directory where you want to store the code repository (note that this is totally arbitrary). I believe there are some slight differences in syntax depending on the OS and/or terminal, but let’s suppose you keep (or want to keep) your git projects within the
C:/gitdirectory. In this case you would run the command:
cd c:/git- You’ll know you’re in the right place if you see something like following left of the blinking cursor in the terminal:
c:\git>- OK, now go ahead and copy the following command and run it in your terminal:
git clone https://github.com/jtasse/docsastests-demo.git- You should see
Cloning into 'docsastests-demo'…and some other messages appear in your terminal. If there are no errors, you can move on to installing dependencies.
Dependencies
Dependencies are software (often referred to as packages) that we can include in a project if we don’t want to write the code for the corresponding functions ourselves. For example, since I do not want to write a tool that can auto-detect assertions in markdown and test them, we are going to install Doc Detective as a dependency.
One nice thing about dependencies is that it is generally quite easy to install them once they are defined in your project.
Further reading: if you’d like to see the dependencies for the
docsastests-demorepo (or any other node-based project), open the package.json file at the root of the repo.
- OK, now open a terminal (or use an existing one) and navigate to the root of the now-cloned
docsastests-demorepo. For example, if you put it in the location I used above, the command would be:
cd C:\git\docsastests-demoTip: modern IDEs like VS Code tend to have built-in terminal functionality. Although it’s not required to use it, you might find that it cuts down on context-switching and helps you ensure you are in the right place (when running commands that are directory-sensitive)
- Now run the following command:
npm install- You should see some activity in your terminal. This command can take a long time to run in bigger projects, but we only have a few packages so it shouldn’t take more than a couple minutes.
NOTE: after the package install is complete you might see a message in your output that looks like this:
19 vulnerabilities (6 moderate, 13 high)Unless you plan on creating and releasing production software from your current project/code, these vulnerabilities won’t affect you. 👹
Structure of the docsastests-demo project
We’ve installed all the stuff! However, before we jump into testing a quick tour of the project is in order.
You can think of docsastests-demo as a Frankenstein application that has one purpose—helping you learning how Docs as Test-ing (ugh, I know) works. After you go through the demo you are free to copy it, extend it, or delete it as you see fit. But for now, here’s a reference image and corresponding docs for how things are laid out:

NOTE: the content of this project workspace screenshot will become out of date almost immediately, as some folders (like the test results) will update with every test. However, I will try not to change the structure of the project more than is necessary
- product: folder containing the files for the web application we are testing
- readthedocs: folder containing our Read the Docs implementation
- source: this is the folder where I am storing markdown files to be tested (we will use the highlighted
account-setup.mdfile for our first test) - results: this is the folder where
Doc Detectivewill store test results (you can change this in.doc-detective.json) - .markdown-doctest-setup.js: contains required setup code for markdown-doctest.
- .doc-detective.json: the configuration file for Doc Detective (see the Doc Detective config docs for more info)
- package.json: this file manages packages for the project (see the npm docs for more info)
Running the tests
UI Test (Doc Detective)
In this test we are going to use Doc Detective to run the test described in the demo portion of the previous blog post. After confirming that the test fails, we are going to make the required change in our docs and run the tests again to verify the issue is resolved.
- Begin by opening the
account-setup.mdfile, which lives at the pathreadthedocs/docs/source/account-setup.md. (This file is also highlighted in my workspace screenshot above).
NOTE: paths can be a bit confusing depending on the use case, but I usually mean “path if starting from the workspace root”. If I mean something else, I will try to call it out.
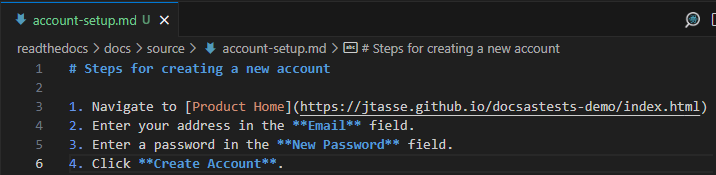
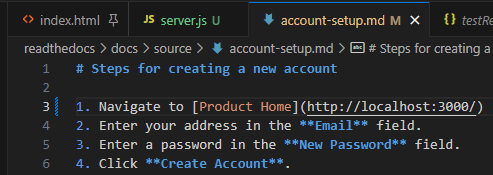
- OK, so you should see markdown match what I have here:
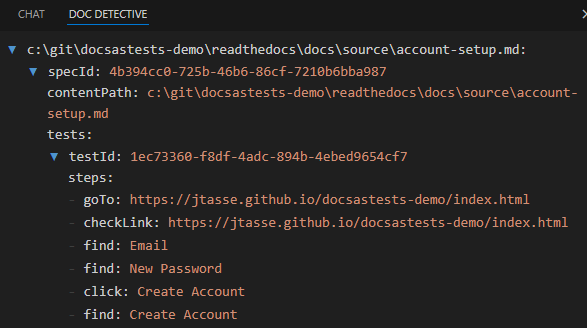
(Optional – VS Code Only) see detected Doc Detective tests before they run
- I didn’t want to lengthen the critical path of this post, but if you have a minute to spare I think you’ll find the Doc Detective extension useful. To get it, do the following:

- Click the extensions icon on the left sidebar (it looks like a block being added to 3 existing blocks)
- Search for Doc Detective
- Install the extension via the pane that appears (not shown)
- Once the installation is complete, you can access the Doc Detective extension by clicking its icon in the sidebar

- You should now see the tests that Doc Detective found in the
account-setup.mdfile.
NOTE: if you do not see any content, go back and make sure you have
account-setup.mdopen
- Before we can test our docs against our product, we need to bring the product page (located at
product/index.html) online. To do this, open a terminal and run the command:
node server.js- You should get a confirmation in the terminal that the server is running:

NOTE about terminals: when you run a process like a Node server in a terminal, the process essentially takes that terminal over. So if you want to run other commands without interrupting the server, you need a new terminal instance.
- First, open a new terminal instance.
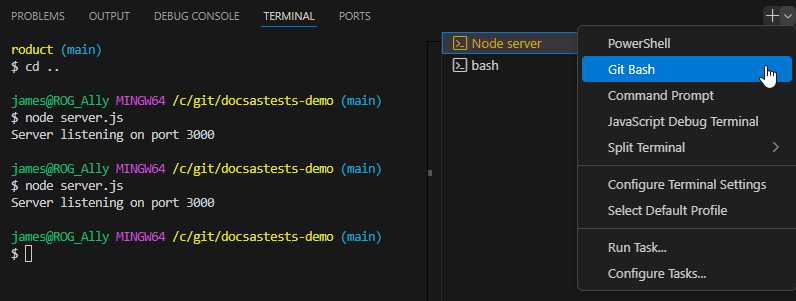
(Optional) VS Code Terminal Management
ANOTHER note about terminals: you could manually run a new instance of Git Bash, PowerShell, etc. outside of your IDE and
cdto the project directory; but it’s worth mentioning that VS Code does have a nice menu for adding and managing terminals.
- Now, from the new terminal (not the one running the Node server), execute the following command:
npx doc-detective --input readthedocs/docs/source/account-setup.mdNOTE:
npxis a Node command that lets you run…other commands. Further reading in the npm docs.
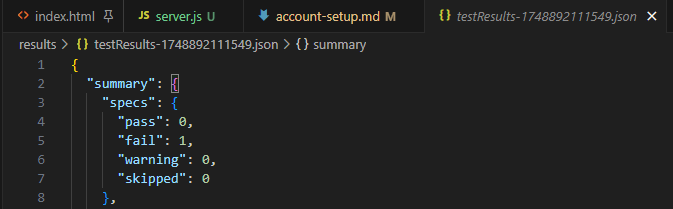
- This test might take a couple minutes, and you’ll see a lot of activity in the terminal. Keep waiting until you see the following:

- Indicates where the test results for this run have been saved.
- Shows that the terminal is ready to accept new commands.
- At this point we could just scroll up in the terminal to see the test results, but because of all the output in the terminal I find it’s easy to get lost there. Instead, let’s go ahead and open the results file directly.
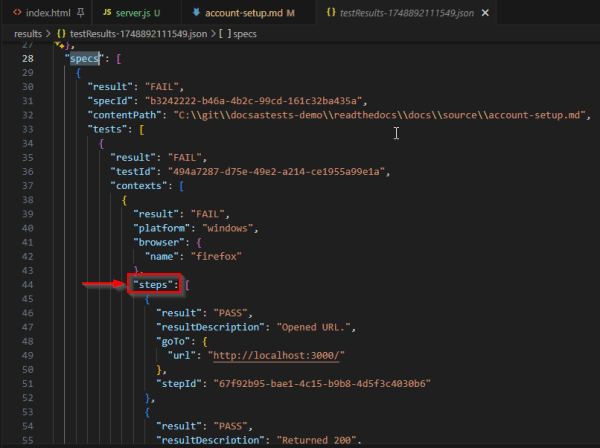
Tip: even within the results file, there is still a lot of content! To jump to the results we care about the most, do a find (
Ctrl + F) in the file and search for:"steps": [
OK, we made it to our test results! But rather than relying on screenshots, let’s review each JSON result one block at a time…
NOTE: if you see any discrepancies in your test results compared to mine, feel free to reach out to me.
Reviewing Test Results One by One
NOTE: if you installed the optional Doc Detective extension in VS Code, the structure of these results should look familiar
Let’s start with the first block:
Style note: apologies for the white-themed code blocks appearing within an otherwise-dark theme (JSON does look a little better in this block style than a bare-bones dark code block). If anyone knows how to change this behavior in the WordPress block editor I would love to hear it 😊
                {
                  "result": "PASS",
                  "resultDescription": "Opened URL.",
                  "goTo": {
                    "url": "http://localhost:3000/"
                  },
                  "stepId": "67f92b95-bae1-4c15-b9b8-4d5f3c4030b6"
                }
Nice! With this test, Doc Detective:
- Saw the URL in the first step of our
account-setup.mdfile - Attempted to access the URL and succeeded
- Reported a “PASS” result for this test
Let’s look at the next test:
{
                  "result": "PASS",
                  "resultDescription": "Returned 200",
                  "checkLink": {
                    "url": "http://localhost:3000/"
                  },
                  "stepId": "9681b914-1cb4-42d2-8e9e-0af1d21602f6"
                }
If you’re not familiar with HTTP response codes, a 200 means that the request has succeeded. To me, the previous test result (i.e. – successful navigation to a web page) seemingly renders this test unnecessary; but there could be a reason Doc Detective runs this test separately, and it is definitely not doing any harm!
Next!
                {
                  "outputs": {
                    "element": {
                      "text": "Email"
                    }
                  },
                  "result": "PASS",
                  "resultDescription": "Found an element matching selector. Found element by text.",
                  "find": "Email",
                  "stepId": "79fe9fb3-0843-4711-94fa-bc757493c9e5"
                }
This is an example of Doc Detective being quite clever. Here’s what it did:
Let’s start using DD as shorthand for Doc Detective, which delivers (at least) a double-dose of testin’
- DD saw that email in
account-setup.mdwas wrapped in double-asterisks (so**Email**). - DD does not think (as far as I know?), but if it did, it made a note of the above and thought “I’m going to go and look for an email field on the product page” mentioned in step 1.
- DD determined that the product page *indeed contained an email field, and reported that it “Found an element matching selector” (i.e. –
Email) - Recorded a
PASSresult for this test
*CAUTION: I wanted to call out here that Doc Detective appears to require a field label (in this case,
<label for="email">Email</label>) in order to pick up
Next test.
{
                  "outputs": {
                    "element": {
                      "text": "New Password"
                    }
                  },
                  "result": "PASS",
                  "resultDescription": "Found an element matching selector. Found element by text.",
                  "find": "New Password",
                  "stepId": "7b331142-38da-46f3-b9ef-feef72202593"
                }
This test was very similar to the test for the Email field, with DD looking for a New Password field instead. It passed once DD found the following label in index.html: <label for="password">New Password</label>
All right, we’ve made it to the last test of this particular demo!
                {
                  "result": "FAIL",
                  "resultDescription": "No elements matched selector or text.",
                  "click": "Create Account",
                  "stepId": "d942f059-bb0c-4f6a-862f-d948d976538c"
                },
In this test, DD searched for an element with the text “Create Account”, but couldn’t find it. So the test failed.
In a real world example, this might manifest as the Development/Engineering team changing the text of a button without informing the Docs team that the corresponding documentation needed to be updated. But we have tests now, and we just caught it before the release! 🥳
NOTE: I do see another
"Create Account not found"failed test that appears identical to the one above. I am not sure why there is another one, but I am going to ignore it for now and move on.
Making & Verifying the Fix
OK, so Doc Detective found a discrepancy between the docs and the product. Awesome! But what happens next?
While it’s possible that the change in the product was a mistake, it’s probably more likely that the Product team wanted to change the button language to what it is now (i.e. – Sign Up instead of Create Account) and they just forgot to tell the Docs team. (I mean hopefully they forgot and it’s no all out war between departments! 💥).
Accordingly, it would probably be a good idea for your Docs team to reach out to Product to confirm that this was indeed a misunderstanding. Let’s assume that it was, in which case there is no further action required by the Product or Engineering teams for this particular case.
Obviously if the Docs team is implementing Docs as Tests, at some point one would expect a dialogue between the Docs team and Product, Engineering, etc. That is outside the scope of this (already long) post, but Manny Silva’s Docs as Tests book does a good job addressing it!
But now that we know what the “blessed” language from Product looks like, let’s go ahead and update our docs.
- First, open
readthedocs/docs/source/account-setup.mdin your IDE. - Now, on line 6 where it reads:
4. Click **Create Account**…
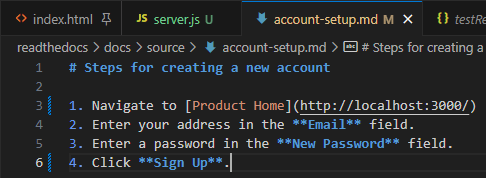
- …change it so it reads
4. Click **Sign Up**.(Be sure to save your changes).
- Now go ahead and run your tests again:
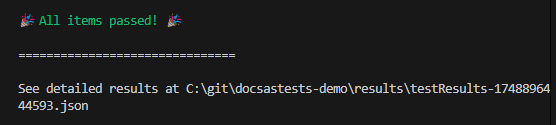
npx doc-detective --input readthedocs/docs/source/account-setup.md- When the test run finishes, you should see something that makes you very happy: all items passed!
But just to be sure, let’s take at the formerly failing test which is now passing:
                {
                  "outputs": {
                    "element": {
                      "text": "Sign Up"
                    }
                  },
                  "result": "PASS",
                  "resultDescription": "Found an element matching selector. Found element by text.",
                  "find": "Sign Up",
                  "stepId": "933314a7-0851-4319-ad00-355b024f9390"
                }
Bravo—you just resolved a discrepancy between the docs and the product before it ever got out the door! 🥳
API Test (markdown-doctest)
Up until now, our testing has been all about the UI. But I wanted to conclude this post by dipping into another area, and why not API testing?
In this test we’ll use markdown-doctest to find an issue with one of our code snippets. As with our previous test, we’ll fix the issue (this time in our code snippet) and verify our test passes.
- All right, since we don’t need a local web server for this test, you can (optionally) stop the Node server you ran in the previous test by opening the terminal where it’s running and pressing
CTRL + C. - Now go ahead and open the file
readthedocs/docs/source/js.mdin your IDE.
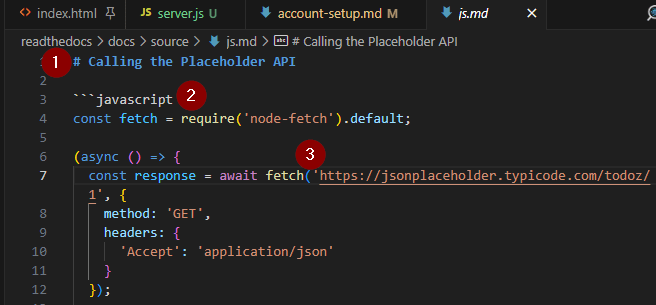
- Remember that this is a markdown file (even though it is comprised mostly of JavaScript)
- In markdown, 3 backticks (‘`’) followed by a language identifier begins a code block (or code snippet).
- This is the most important line for our testing. Keep an eye on that URL 🧐
Cool. We already did our setup earlier, so let’s go ahead and run the test!
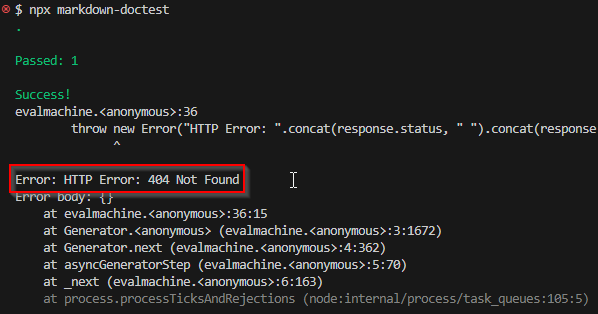
npx markdown-doctestThe output here is a bit misleading on account of some combination of A) the JavaScript I told Copilot to write for our snippet and B) the expected usage for markdown-doctest. 😏 But that’s OK, as we can still get a meaningful result. As I’ve highlighted below, the test reported that it encountered an HTTP response code of 404 (not found) when trying to do a fetch from the endpoint at https://jsonplaceholder.typicode.com/todoz/1.
- Wait a minute, what’s a TODOz list? 😁 Let’s go back to our
readthedocs/docs/source/js.mdfile and fix the code snippet. - Change the URL on line 7 from
https://jsonplaceholder.typicode.com/todoz/1tohttps://jsonplaceholder.typicode.com/todos/1and save your changes. - Your js.md file should now look like this:

- Now run the test again
npx markdown-doctest
Look, no 404! Essentially, we just verified that after fixing a typo in one of our code snippets, the test suite is now able to reach the correct endpoint without errors. And because we caught it before the docs were released, we didn’t have to hear about the developers who called Support asking why their TODOz apps weren’t working. 😂
Great job! 👍
What now?
Since you’ve now tested a UI and API using different tools, you can officially say you have Docs as Tests experience in those areas 😎 And seriously, give yourself credit for all of the work it took to get here. Last I checked, the widget that indicates “reading time” for this post was at 20 minutes, but I suspect it took you at least 2-3 times make it through all of that setup and testing (probably more for the less technical folks 🫡).
But obviously it doesn’t end here. For my part, I’m going to move on to making a video that covers this and the last post. I know some people vibe with learning from videos more than reading, and I also have a large video-shaped hole in my portfolio 🫤
Code Coverage
After that, there is a topic that I think deserves some attention: code coverage. You’ve probably noticed that I have a strong preference for running tests that are auto-detected using tools like Doc Detective. Aside from the fact that these tests have high return on investment, they also scale with your docs automatically.
However, if code coverage of documentation-based tests is taken into account, it becomes easier for us to have confidence that we are “covering” all of our products with these tests. And, crucially, this can help us prevent our hand-crafted tests from becoming out of sync with our docs.
That’s it for now. Follow me on LinkedIn if you’d like to be notified when I publish a video or another blog post.
Cheers.


Leave a comment